Removing a wheel cover or hubcap
The first task in changing a flat is to remove the wheel cover or hubcap on the injured tire. The following steps tell you how:
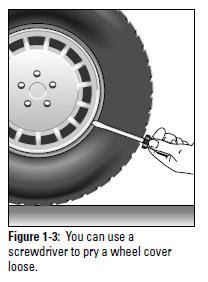
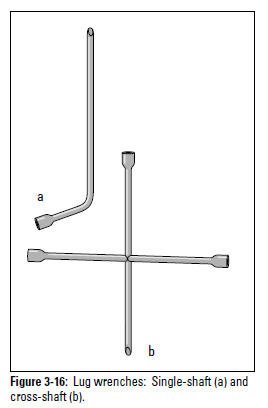
1. If your car has a standard wheel cover or hubcap, use a screwdriver or the flat end of a lug wrench (see Figure 3-16) to pry it off. Just insert the point of the tool where the edge of the cover meets the wheel, and apply a little leverage (see Figure 1-3). The cap should pop off. You may have to do this in a couple of places, as if you were prying the lid off a can of paint.
Caution: If the cover has a delicate finish, consult your owner's manual for instructions on how to remove it without damage. It may pry off or unscrew.
2. Lay the cover down on its back so that you can put the lug nuts into it to keep them from rolling away and heading for the nearest sewer. If you're afraid of marring the finish, lay the cover on a rag.
After you remove the wheel cover or hubcap, the next task is to loosen the lug nuts.
Loosening the lug nuts
Lug nuts are those big nuts that hold the wheel in place. How you remove the lug nuts on your vehicle depends on whether you have alloy wheels that are held on by lug nuts with delicate finishes, or hubcaps or wheel covers with standard lug nuts behind them.
Lug nuts with special finishes
Caution: The delicate aluminum or chrome-plated lug nuts on alloy wheels need careful handling. They should never be loosened or replaced with power tools that can scratch the delicate finish. (Some power tools have rubberized or plastic-coated fittings to avoid damaging the nuts, but those will be of no use to you on the road with no power supply to run them.) Many mechanics prefer to do it all by hand using a special lug fitting to avoid scarring the finish or rounding off the corners of the nuts. You can find this fitting at many parts and tire shops.
Some alloy wheels come with one or more locking nuts on each wheel to help discourage wheel thieves, and you must use the special "key" that came with the car to unlock them before loosening. Be sure you know where your wheel locks are, if your vehicle has them.
Tip:
Lug nuts with standard finishes
Most garages retighten ordinary lug nuts with a power tool, and unless you've done the job yourself by hand, they're pretty hard to loosen yourself. (Take my advice and buy a cross-shaft lug wrench. Figure 3-16 shows what one looks like.)
Tip: To make the job easier if an emergency arises, you may want to go out and try to remove the lug nuts on your vehicle now, following these instructions. If you have problems, resolve them now so that you won't have to struggle at the side of the road.
1. Find the end of the wrench that fits the lug nuts on your vehicle, and fit it onto the first nut. Always work on lug nuts in consecutive order so that you don't forget to tighten any later.
2. Apply all your weight to the bar on the left. This starts turning the nut counterclockwise, which loosens it.
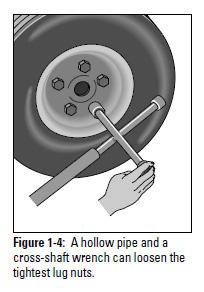
Tip: I don't suggest using this kind of strong-arm tactic on lug nuts with special finishes, but if an ordinary nut has been put on with a power tool and you can't get it started, a piece of hollow pipe, fitted over that left-hand arm of the cross-shaft wrench, magically adds enough leverage to start the nut easily (see Figure 1-4). After you replace the nut yourself, this aid is no longer necessary. But remember, the longer the arms on your lug wrench, the more leverage you have.
Remember: Don't remove the lug nuts completely; just get them loose enough to remove by hand after jacking up the vehicle.
Changing the tire
Before you jack up your vehicle, remove the spare from the trunk. After the vehicle is safely jacked up and the lug nuts are off, follow these instructions to change the tire:
1. Roll the spare tire to the scene of the action if you haven't already done so.
2. Grasp the flat tire with both hands and pull it toward you. The flat tire sits on the exposed bolts that the lug nuts screw onto. As you pull the flat off, it should slide along the bolts until, suddenly, it clears the end of the bolts and you find yourself supporting its full weight. Tires are heavy, and you'll be quite happy to lower it to the ground (if you haven't already dropped it).
3. Roll the flat along the ground to the rear of the vehicle to get it out of the way.
4. Lift the spare onto the lug bolts. Because tires are heavy, you may have a little trouble lifting the spare into place -- especially if you're not accustomed to lifting heavy things.
5. After you have the spare tire in place, replace the lug nuts and tighten them by hand. Give each lug nut a jolt with the wrench to get it firmly into place, but wait until the car is on the ground before you really try to tighten the lug nuts.
6. Replace the jack, use it to lift the vehicle off the jack stands and lower the car to the ground.
7. After the vehicle is resting on the ground, use the lug wrench to tighten the lug nuts as much as you can.
Caution: If your vehicle has alloy wheels, tighten the lug nuts until the lug wrench won't move any more, then press down on the wrench's cross arm with all your weight, but don't jerk it or kick it or jump on it as you could cause the wrench to damage the finish on the nut.
Standard lug nuts are sturdier than those on alloy wheels, but you don't want to twist them off the bolts or ruin the threads. However, you don't want the wheel to fall off, either. If you're worried about tightening them sufficiently, use your hollow pipe, or step on the right-hand arm of the lug wrench after the nut is tight.
8. Replace the wheel cover or hubcap. If your car has wheel covers with a delicate finish, the owner's manual should provide instructions for replacing it. If not, reverse the order of things you did when removing it (if you had to pry it off, then it probably pops back in with a sharp tap of your hand; if it unscrewed like a big jar top, then it screws back in).
If your car has hubcaps, place the hubcap against the wheel and whack it into place with the heel of your hand. Cushion your hand with a soft rag first so that you won't hurt it. And don't hit the hubcap with a wrench or hammer -- you'll dent it. Whack it a couple of times, in a couple of places, to be sure that it's on evenly and securely. (Even secondhand hubcaps can be expensive to replace, and that's if you can find the one you need.) If it's too much of a hassle, or if you don't have the time to replace the hubcap, you can take it home and install it later; it's mostly ornamental, and you can drive for a while without it. But do replace it soon because it helps keep dust and dirt out of your brakes and bearings.
9. Put the flat in the trunk where the spare was located, and put your tools (including wheel blocks) away.
From Auto Repair for Dummies, copyright © 2009 by Wiley Publishing, Inc., Indianapolis, Indiana. Used by arrangement with John Wiley & Sons, Inc.