Disc brakes work using a simple system: brake pads contained within the caliper (the clamp-like object around the brake rotor, or disc) apply pressure to the rotor and slow the car when you press the brakes. As the pads and rotor experience wear and tear, they need periodic rebuffing or replacement. Fortunately, inspecting and maintaining these items is relatively easy. Just follow the steps below.
Tools you’ll need:
- Six-point wrench
- Replacement pads (if necessary)
- Jacks and jack stands
- Strong wire or bungee cord
- Set of new brake pads (even if you don’t need to replace them now, it’s good to have a set around for comparison purposes)
- Brake pad grease (usually comes in packets)
1. Before inspection, make sure your vehicle hasn’t been driven for an hour or two—the caliper can be hot if you’ve just been driving.
2. Raise one end of the vehicle on jack stands. If you loosen the lug nuts on the wheels just a bit before raising the car, it usually makes the process easier.
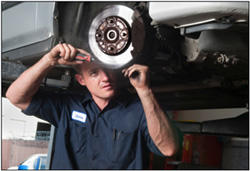
3. When your auto is jacked up and stabilized, remove a wheel and give the brake disc an initial inspection—most calipers have an “inspection hole” where you should get a good view of the disc’s thickness. If the disc shows signs of uneven wear, you will need to take it to a professional to see if it can be reground or needs to be replaced.
4. To inspect the brake pads, you will need to remove the caliper from the disc by disconnecting its mounting bolts using your six-point wrench. Secure the caliper to the car and away from the disc using a strong wire or bungee cord (be sure not to hang it by the brake hose).
5. The brake pads are inside the caliper, and are held in place by either bolts or clips, depending on your vehicle. Remove all bolts and clips and slide the pads out from inside the caliper. If the pads are worn down (less than ¼” thickness), replace them with new ones. When installing the new pads, lubricate the back of the pads with the brake pad grease.
6. While the caliper is away from the disc, take a closer look at the disc itself. Remove any glaze from the disc surface by running a sandpaper across it in a swirling motion. If the disc has any grooves in it, it will need to be inspected by a mechanic. Sometimes discs can be reground, but they may need replacement.
7. When your disc and brake pads are ready to go, fit the disc back onto its rotor and retighten all lug nuts and screws. Reconnect the caliper to the disc with its mounting bolts, and replace the wheel.
8. Follow steps 1-7 for all other wheels if necessary, and when finished, lower the car and remove jacks.
Related Links:
Brake Maintenance: 5 Warning Signs
Brake Failure: Emergency Tips
Brake Maintenance: Checking Brake Fluid
Brake Maintenance: Checking and Replacing Your Brake Lines
Brake Maintenance: Bleeding Your Brakes
© Copyright 2025 Military.com. All rights reserved. This article may not be republished, rebroadcast, rewritten or otherwise distributed without written permission. To reprint or license this article or any content from Military.com, please submit your request here.